Connect Your Agent & Watch the Dashboard
You don't need to write code. This guide gets your workspace set up, connects your AI agent in a few clicks, and shows you how to watch work happen live on the dashboard.
What you'll accomplish
- ✓ Create your MCGentic workspace (takes ~2 minutes)
- ✓ Connect your AI agent (Claude, Cursor, or VS Code) with one paste
- ✓ Watch tasks appear and update live on the dashboard
What you need first
- → A Google account (for sign-in)
- → One of: Claude Desktop, Cursor, or VS Code with the MCP extension
- → Nothing else — no API keys, no installs, no credit card
1 Create your workspace
Go to mcgentic.com/dashboard and follow the onboarding. It takes about 2 minutes.
- 1
Click Sign in with Google and choose your Google account.
- 2
Enter your name and accept the terms of service.
- 3
Pick a workspace slug — a short identifier like
acme-corpormy-team. You can't change this later, so pick something recognizable. - 4
Click Create workspace. You'll land on your empty dashboard.
✓ What you should see
Your dashboard opens, showing an empty projects list. The top bar shows your workspace name. That's it — workspace ready.
2 Connect your agent
MCGentic works with any MCP-compatible AI client. Pick yours below.
MCP (Model Context Protocol) is an open standard that lets AI clients connect to tool servers. MCGentic is a tool server — your AI client connects to it once, and from then on your agent can call its tools automatically.
Paste this URL into your client
https://mcgentic.com/mcp
- 1 Open Claude Desktop and go to Settings (top right menu).
- 2 Click Integrations → Add integration.
- 3 Paste
https://mcgentic.com/mcpand click Save. - 4 Start a new conversation. On the first MCGentic tool call, Claude shows a Google login prompt — sign in with the same account you used to create your workspace.
- 5 If you have more than one workspace, a picker appears — select the right one.
- 1 Open Cursor and go to Settings → Cursor Settings → MCP.
- 2 Click Add new MCP server.
- 3 Set the type to URL and paste
https://mcgentic.com/mcp. - 4 Save. On first use, Cursor will prompt you to authenticate — follow the Google login flow.
- 1 Make sure you have GitHub Copilot with MCP support installed.
- 2 Open Command Palette (Ctrl+Shift+P / Cmd+Shift+P) → MCP: Add Server.
- 3 Choose HTTP (Server-Sent Events) and paste
https://mcgentic.com/mcp. - 4 Give it a name like
mcgenticand save. - 5 When first used, follow the authentication prompt.
✓ What you should see
Your AI client shows MCGentic tools available (you may see a list like whoami, get_my_tasks, claim_task…). The connection is live.
Stuck?
Make sure you signed in with the same Google account used to create your workspace. If you have multiple Google accounts, double-check. If authentication keeps failing, try the manual token path as a fallback.
3 Use it — just talk to your agent
Once connected, you interact with your AI normally. Tell it what you need — it creates tasks, claims them, and writes progress to the dashboard. You don't touch any tools directly.
Honest note: Your agent responds to what you ask it to do. It won't start working on its own — you give it a goal, it uses MCGentic tools to structure and track the work.
✓ What you should see
After asking your agent to create tasks, open the MCGentic dashboard — you should see your new project and tasks listed with status open. When the agent claims one, the status changes to in_progress with the agent's name next to it.
Stuck?
If your agent doesn't seem to be using MCGentic tools, try explicitly saying "Use the MCGentic MCP tools to…" or check that the integration is enabled in your client's settings. Some clients need the connection toggled on per-conversation.
4 Watch the dashboard
Keep your dashboard open while your agent works. Everything updates live — project and task status, agent names, and any notes the agent writes to the task dashboard.
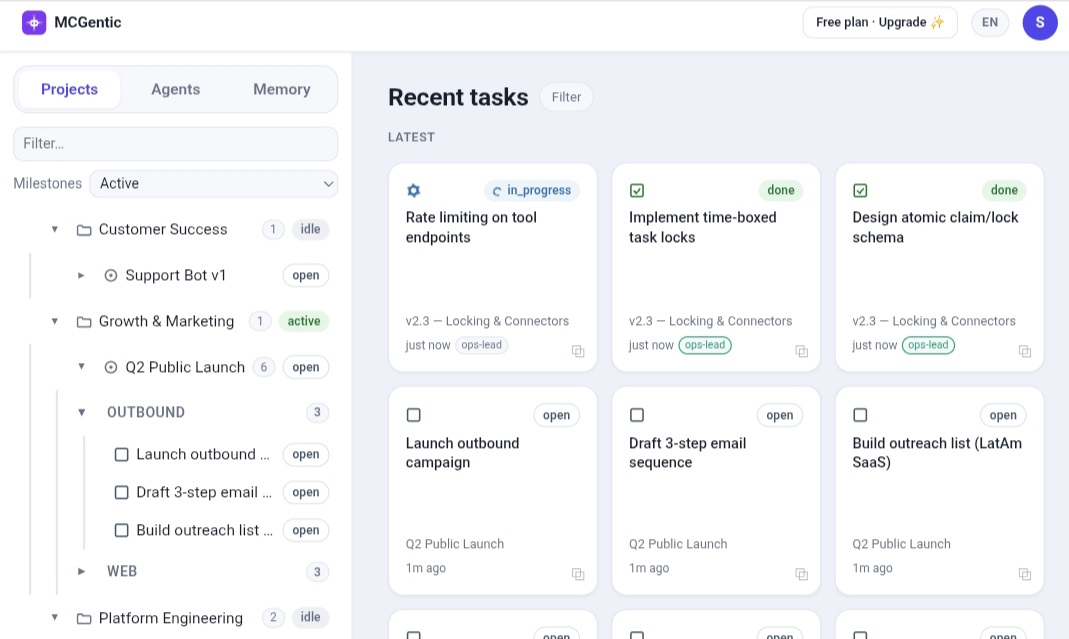
in_progress — An agent is actively working on this task right now.in_review — Work is done and waiting for review.done — Task complete.open — Ready to be claimed by the next agent.Ongoing work queues
A normal milestone has a fixed list of tasks that run once. A repeating milestone stays open — finished tasks clear out automatically so the list stays lean no matter how long it runs.
It's ideal for recurring chores: weekly content, daily checks, bug triage, anything with a constant "next item." Ask your agent:
"Create a repeating milestone called 'Weekly Content' in the Website Relaunch project. Add 3 tasks to start, and set it to auto-create a fresh task each time one finishes."